Welcome!

This is just my little contributuion to the kommunity I hope you guys enjoy the little how-to's and designs :)

Thursday, March 31, 2011

Cheer Nails

Ok, so I have a cheerleading competition this weekend and my wonderful sister let me do her nails in our school colours! :D
They were done late at night, aound 11 so we were rushing and I missed the photo without the stamping :(

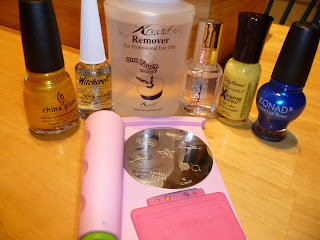
What I used:
Remover and pads
Sally Hansen Mellow Yellow
China Glaze Lighthouse
S7
Special Stamping Polish in Blue Pearl
IP Holder
Stamper and scraper
Base + Top coat


Step 1:
I started off by cleaning her nails with remover and used Witchcraft Protein Hardener as a base coat this time. After the base dried I painted her ring finger and thumb with 2 coats of Mellow Yellow and all the other fingers with 3 coats of Lighthouse. (Yikes! They took forever to dry!)


Step 2:
Before my mom bought the IP holder, we used a folded paper towel under the IP to keep the table clean and its great even if you do have a IP holder. Take the star in the very center that says "cheer" and stamp it onto your thumb and ring finger with the blue pearl polish. On your thumb, you can choose to center it or stamp multiple stars with the points lining up in the crevices of the one beside it.
We had planned to stamp the other fingers in the same pearl polish but with the girl with one fist in the air. Ultimately, we decided that we would keep it nice and simple as to not make it too busy.
The finished look. She doesn't like using topcoat so Essie Good to Go was only used on the Konaded nails.

**A side note on my polish choices: SH Mellow Yellow I LOVE the colour and it only takes 2 coats but its kinda gunky. Next time i think I'll try refrigerate it to see if it applies smoother because its brand new.
China Glaze Lighthouse was great to apply and I love the glitter in it but they take forever to take off and leave your hands all sparkly :/ **
Wednesday, March 30, 2011

Don't Cry Over Spilled Polish!

Ok guys so I did this on my nails a couple months ago so there isn't a step by step with photos but I can show you what I used :)

What I used:
M21
Stamper and Scraper
Remover
Pads and swabs
Sally Hansen Insta-Dry in White
Konad Special Polishes: Sky Pearl, Royal Purple, and what I believe is violet Pearl or Light Gray

After you paint your nails white, randomly stamp paint splatters on each nail (usually one on each of each color). You can even just stamp the tiny little blob and not the big one in spots where there isn't enough room for the full splatter.
After waiting a few minutes I topped it off with Essie Good to Go.
My old phone! Notice the S7 stamped in white om the top and bottom of my phone :)

Sorry about the camera shadow! But the lighting wasn't good Intelligent Auto turned my flash on.

So do you wonderful ladies like full nail, french tips, or individual designs better?
I like full nail designs better because they go nicer with a white background and my base colour choices are limited ;)
For cheer my nails must be kept short so French tips don't work out very well but maybe this summer I'll grow them out again.

How to Konad!

Ok so this is how you do a basic full nail design :) Its the same for the smaller little ones (flowers, stars, etc.) its just a little less messy for smaller designs.

What you need:
Base and top coat
Colour
Special Konad polish
Image plate
Stamper and scraper
Cotton swabs ad cotton pads/rounds
Nail polish remover (Without added nutrients and lotions in them)
Step 1:
Start off by cleaning both your stamper and scraper. If your stamper is brand new you may want to lightly buff it with a nail file to remove any film from the factory.
Remove any polish from nails with remover. Wash and dry your hands before you apply your base coat.
I used Maybelline express finish base & top coat 10 for mine. Depending on your base coat wait for a couple minutes until completely dry.
Step 2:
Now that your lovely top coat is completely dry, apply the first coat of your color with one stroke down the middle and then one down either side. I usually paint one hand at a time so I can still use the other one to text, take the pictures etc.
After dry, you can repeat as necessary. I used my brand new China Glaze Blue Sparrow (neon). The coats were very thin though so I ended up using 3 coats of the polish.
If you'd like, you can clean up any messes and excess polish around your fingers right now but if your using a full nail or french design, I recommend waiting until the end.


Step 3:
Make sure there isn't any old polish or dust sitting in the crevices of your IP (image plate). Take your special stmaping polish and depending on how you like to stamp you can put a medum sized glob at the beginning of the image or a slightly thin coat over the whole image.

Using the scraper, apply pressure and scrape at a 45 degree angle from left to right.

Very quickly, lightly roll the stamper over the plate to pick it up. Now line it up with your nail. Depending on how long your nails are may depend on whether you may need to double stamp or move on to the next finger.

A little sidenote about cleaning your stamp and scraper, I'd say your stamp and plate every 1-2 stamps depending on how intricate the design and how much polish starts drying on them. Definately clean your scraper whenever you change colours or after you finish your hand. It really depends on personal preferance.
Once your finished both hands, clean up any polish you don't want on your fingers and your stmaping supplies.
Here I used my favourite IP M57 and what I believe what is the pastel blue special polish.


Step 4:
As the special stmaping polish dries very quickly it may seem like you could just slather on some top coat and be ready to go.
STOP!
Even though it is dry and feels dry, I always run my hand under cold water before drying them off and waiting a few minutes because I find when your not using the Konad top coat it tends to smudge and blur more if you don't wait a couple minutes first.
A couple minutes later
Ok, so applying top coat with Konadicures is slightly different than just regular polish.
When applying topcoats I like running the brush on my nail quickly and barely using pressure. Use the same technique as the base and colour, one down the middle and then one down both sides.
I used one coat of Essie Good to Go but after I finish this post I think i'm going to add another coat.